TF2 Object Detection
May 10, 2020
There are many guides out there that are very good to help you get started with setting up the TF Object Detection API, but unfortunately, most of them are written for the TF v1 API.
We will take a look at how to use the TF v2 Object Detection API to build a model for a custom dataset on a Google Colab Notebook.
Before we begin the setup, make sure to change the runtime-type in Colab to GPU so that we can make use of the free GPU provided.
Installing Dependencies and setting up the workspace.
Create a folder for your workspace
(Remember, you will be executing all of these commands in your colab/jupyter notebook)
1%mkdir workspace
2%cd /content/workspace
We will be cloning the TF repository from GitHub.
1!git clone --q https://github.com/tensorflow/models.git
And before we install TF Object Detection we must install Protobuf.
“The Tensorflow Object Detection API uses Protobufs to configure model and training parameters. Before the framework can be used, the Protobuf libraries must be downloaded and compiled”
1!apt-get install -qq protobuf-compiler python-pil python-lxml python-tk
2!pip install -qq Cython contextlib2 pillow lxml matplotlib!pip install -qq pycocotools
3%cd models/research/
4!protoc object_detection/protos/*.proto --python_out=.
Now we install the TF Object Detection API
1%cp object_detection/packages/tf2/setup.py .
2!python -m pip install .
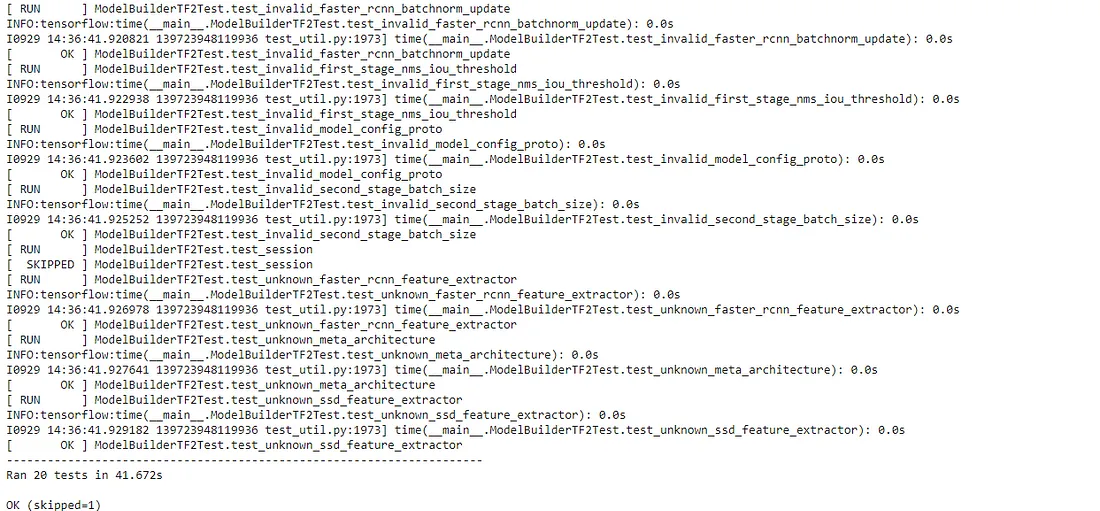
3!python object_detection/builders/model_builder_tf2_test.py
The output should be as follows:
Preparing the Dataset
There are two ways to go about this:
1. Use a Public Labelled Dataset
2. Create a Custom Labelled Dataset
You can find Public Labelled Datasets online, which are already labeled and saved in the right format, ready to be used to train.
For this tutorial, we will be creating our own dataset from scratch.
First things first, gather the images for the dataset. I will assume this step has already been done.
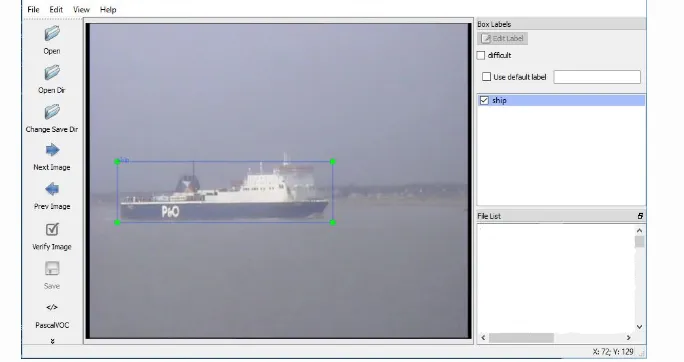
Now we need to label the images. There are many popular labeling tools, we will be using LabelIMG.
To install LabelIMG, execute the following code (Do it on your local Terminal since Colab does not support GUI applications):
1pip install labelImg
Launch LabelImg in the folder where your images are stored.
1labelImg imagesdir
Now you can start labeling your images, for more info on how to label the images follow this link (LabelImg Repository).
Create a label map in notepad as follows (label_map.pbtxt) with two classes for example cars and bikes:
1item {
2    id: 1
3    name: 'car'
4}
5
6item {
7    id: 2
8    name: 'bike'
9}
Now for creating the TFRecord files.
We can do the following:
1. Create TFRecord ourselves
2. Upload the annotations to Roboflow and get the dataset in TFRecord Format.
Creating the TFRecords ourselves is a bit tedious as the XML created after annotating may sometimes vary, so for the sake of ease, I suggest using Roboflow to perform the above task. They also provide an option to perform additional Data Augmentation which will increase the size of the dataset.
For your reference, here is a sample.py script to create the TFRecords manually.
  1import pandas as pd
  2import numpy as np
  3import csv
  4import re
  5import cv2
  6import os
  7import glob
  8import xml.etree.ElementTree as ET
  9
 10import io
 11import tensorflow as tf
 12from collections import namedtuple, OrderedDict
 13
 14import shutil
 15import urllib.request
 16import tarfile
 17import argparse
 18
 19# os.environ['TF_CPP_MIN_LOG_LEVEL'] = '2'    # Suppress TensorFlow logging (1)
 20import tensorflow.compat.v1 as tf
 21from PIL import Image
 22from object_detection.utils import dataset_util, label_map_util
 23from collections import namedtuple
 24xml_dir = 'images/test'
 25image_dir = 'images/test'
 26
 27label_map = label_map_util.load_labelmap('annotations/label_map.pbtxt')
 28label_map_dict = label_map_util.get_label_map_dict(label_map)
 29
 30output_path = 'annotations/test.record'
 31
 32def xml_to_csv(path):
 33    """Iterates through all .xml files (generated by labelImg) in a given directory and combines
 34    them in a single Pandas dataframe.
 35    Parameters:
 36    ----------
 37    path : str
 38        The path containing the .xml files
 39    Returns
 40    -------
 41    Pandas DataFrame
 42        The produced dataframe
 43    """
 44
 45    xml_list = []
 46    for xml_file in glob.glob(path + '/*.xml'):
 47        tree = ET.parse(xml_file)
 48        root = tree.getroot()
 49        for member in root.findall('object'):
 50            value = (root.find('filename').text,
 51                     int(root.find('size')[0].text),
 52                     int(root.find('size')[1].text),
 53                     member[0].text,
 54                     int(member[4][0].text),
 55                     int(member[4][1].text),
 56                     int(member[4][2].text),
 57                     int(member[4][3].text)
 58                     )
 59            xml_list.append(value)
 60    column_name = ['filename', 'width', 'height',
 61                   'class', 'xmin', 'ymin', 'xmax', 'ymax']
 62    xml_df = pd.DataFrame(xml_list, columns=column_name)
 63    return xml_df
 64
 65
 66def class_text_to_int(row_label):
 67    return label_map_dict[row_label]
 68
 69
 70def split(df, group):
 71    data = namedtuple('data', ['filename', 'object'])
 72    gb = df.groupby(group)
 73    return [data(filename, gb.get_group(x)) for filename, x in zip(gb.groups.keys(), gb.groups)]
 74
 75
 76def create_tf_example(group, path):
 77    with tf.gfile.GFile(os.path.join(path, '{}'.format(group.filename)), 'rb') as fid:
 78        encoded_jpg = fid.read()
 79    encoded_jpg_io = io.BytesIO(encoded_jpg)
 80    image = Image.open(encoded_jpg_io)
 81    width, height = image.size
 82
 83    filename = group.filename.encode('utf8')
 84    image_format = b'jpg'
 85    xmins = []
 86    xmaxs = []
 87    ymins = []
 88    ymaxs = []
 89    classes_text = []
 90    classes = []
 91
 92    for index, row in group.object.iterrows():
 93        xmins.append(row['xmin'] / width)
 94        xmaxs.append(row['xmax'] / width)
 95        ymins.append(row['ymin'] / height)
 96        ymaxs.append(row['ymax'] / height)
 97        classes_text.append(row['class'].encode('utf8'))
 98        classes.append(class_text_to_int(row['class']))
 99
100    tf_example = tf.train.Example(features=tf.train.Features(feature={
101        'image/height': dataset_util.int64_feature(height),
102        'image/width': dataset_util.int64_feature(width),
103        'image/filename': dataset_util.bytes_feature(filename),
104        'image/source_id': dataset_util.bytes_feature(filename),
105        'image/encoded': dataset_util.bytes_feature(encoded_jpg),
106        'image/format': dataset_util.bytes_feature(image_format),
107        'image/object/bbox/xmin': dataset_util.float_list_feature(xmins),
108        'image/object/bbox/xmax': dataset_util.float_list_feature(xmaxs),
109        'image/object/bbox/ymin': dataset_util.float_list_feature(ymins),
110        'image/object/bbox/ymax': dataset_util.float_list_feature(ymaxs),
111        'image/object/class/text': dataset_util.bytes_list_feature(classes_text),
112        'image/object/class/label': dataset_util.int64_list_feature(classes),
113    }))
114    return tf_example
115
116csv_path = None
117def main(_):
118
119    writer = tf.python_io.TFRecordWriter(output_path)
120    path = os.path.join(image_dir)
121    examples = xml_to_csv(xml_dir)
122    grouped = split(examples, 'filename')
123    for group in grouped:
124        tf_example = create_tf_example(group, path)
125        writer.write(tf_example.SerializeToString())
126    writer.close()
127    print('Successfully created the TFRecord file: {}'.format(output_path))
128    if csv_path is not None:
129        examples.to_csv(csv_path, index=None)
130        print('Successfully created the CSV file: {}'.format(csv_path))
131
132if __name__ == '__main__':
133    tf.app.run()
Use the above code for train and test images to create train.tfrecord and test.tfrecord respectively by changing the following:
1xml_dir = 'images/test'
2image_dir = 'images/test'
3output_path = 'annotations/test.record'
By using Roboflow you will be provided the TFRecord files automatically.
Setting up on Colab
Create folders to store all the necessary files we have just created.
my_mobilenet folder is where our training results will be stored
1%mkdir annotations exported-models pre-trained-models models/my_mobilenet
Now upload the newly created TFRecord files along with the images and annotations to Google Colab by clicking upload files.
You could use Google Drive to store your necessary files and importing those to Google Colab should be as simple as doing a !cp command.
Download Pre-Trained Model
There are many models ready to download from the Tensorflow Model Zoo.
Be careful in choosing which model to use as some are not made for Object Detection. For this tutorial we will be using the following model:
SSD MobileNet V2 FPNLite 320x320.
Download it into your Colab Notebook and extract it by executing:
1%cd pre-trained-models
2!curl "http://download.tensorflow.org/models/object_detection/tf2/20200711/ssd_mobilenet_v2_fpnlite_320x320_coco17_tpu-8.tar.gz" --output "ssd_mobilenet_v2_fpnlite_320x320_coco17_tpu-8.tar.gz"
1model_name = 'ssd_mobilenet_v2_fpnlite_320x320_coco17_tpu-8'
2model_file = model_name + '.tar.gz'
3tar = tarfile.open(model_file)
4tar.extractall()
5tar.close()
6os.remove(model_file)
Your directory structure should now look like this:
workspace/
├─ models/
│  ├─ community/
│  ├─ official/
│  ├─ orbit/
│  ├─ research/
│  ├─ my_mobilenet/
│  └─ ...
├─ annotations/
│  ├─ train/
│  └─ test/
├─ pre-trained-model/
├─ exported-models/
Editing the Configuration file
In TF Object Detection API, all the settings and required information for training the model and evaluating is situated in the pipeline.config file.
Let us take a look at it:
The most important ones we will need to change are:
 1batch_size: 128
 2fine_tune_checkpoint: "PATH_TO_BE_CONFIGURED"
 3num_steps: 50000
 4num_classes: 2
 5fine_tune_checkpoint_type: "classification"
 6train_input_reader {
 7  label_map_path: "PATH_TO_BE_CONFIGURED"
 8  tf_record_input_reader {
 9    input_path: "PATH_TO_BE_CONFIGURED"
10  }
11}
12eval_input_reader {
13  label_map_path: "PATH_TO_BE_CONFIGURED"
14  shuffle: false
15  num_epochs: 1
16  tf_record_input_reader {
17    input_path: "PATH_TO_BE_CONFIGURED"
18  }
19}
batch_size is the number of batches the model will train in parallel. A suitable number to use is 8. It could be more/less depending on the computing power available.
A good suggestion given on StackOverflow is:
Max batch size = available GPU memory bytes / 4 / (size of tensors + trainable parameters)
fine_tune_checkpoint is the last trained checkpoint (a checkpoint is how the model is stored by Tensorflow).
If you are starting the training for the first time, set this to the pre-trained-model.
If you want to continue training on a previously trained checkpoint, set it to the respective checkpoint path. (This will continue training, building upon the features and loss instead of starting from scratch).
 1# For Fresh Training
 2fine_tune_checkpoint: "pre-trained-model/ssd_mobilenet_v2_fpnlite_320x320_coco17_tpu-8/checkpoint/ckpt-0"
 3
 4# For Contuining the Training
 5fine_tune_checkpoint: "exported_models/your_latest_batch/checkpoint/ckpt-0"
 6
 7batch_size = 8 # Increase/Decrease this value depending on how fast your train job runs and the availability of the Compute Resources.num_steps: 25000 # 25000 is a good number of steps to get a good loss.
 8
 9fine_tune_checkpoint_type: "detection" # Set this to detection
10
11train_input_reader {
12  label_map_path: "annotations/label_map.pbtxt"   # Set to location of label map
13  tf_record_input_reader {
14    input_path: "annotations/train.tfrecord"   # Set to location of train TFRecord file
15  }
16}
17
18# Similarly do the same for the eval input reader
19eval_input_reader {
20  label_map_path: "annotations/label_map.pbtxt"
21  shuffle: false
22  num_epochs: 1
23  tf_record_input_reader {
24    input_path: "annotations/test.tfrecord"
25  }
26}
After editing the config file, we need to add the TensorFlow object detection folders to the python path.
1import os
2os.environ['PYTHONPATH'] += ':/content/window_detection/models/:/content/window_detection/models/research/:/content/window_detection/models/research/slim/'
Setting up TensorBoard on Colab to monitor the training process
Colab has introduced inbuilt support for TensorBoard and can now be called with a simple magic command as follows
1%load_ext tensorboard
2%tensorboard --logdir 'models/my_mobilenet'
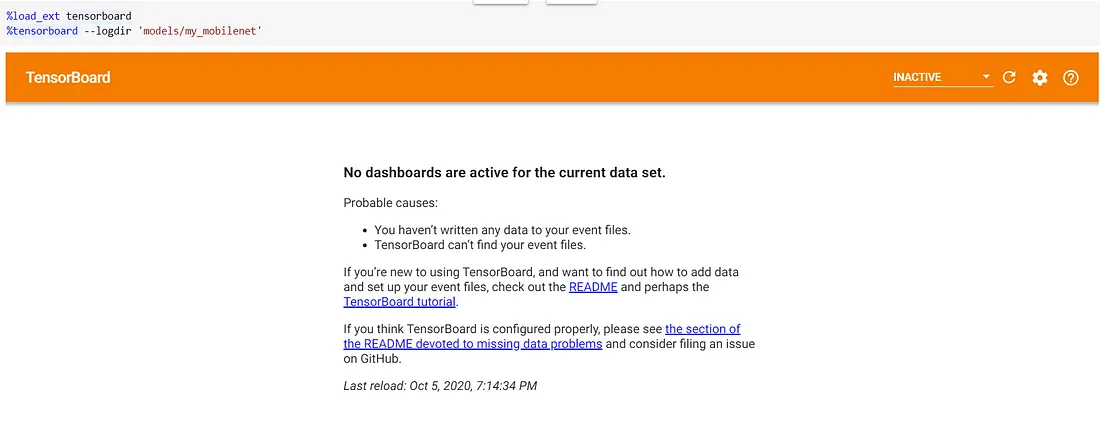
This is how the cell will look once you execute the above command, but nothing to worry, once we start the training job, click refresh on the Tensorboard cell(Top Right) after a few minutes(The .tfevent files need to be created for us to monitor the TensorFlow logs) and you will see the output on the TensorBoard magic cell
Running the Training Job
We will copy the TensorFlow training python script to the workspace directory for ease of access.
1!cp '/content/window_detection/models/research/object_detection/model_main_tf2.py' .
The training job requires command-line arguments, namely:
model_dir: This refers to the path where the training process will store the checkpoint files.pipeline_config_path: This refers to the path where the pipeline.config file is stored
Execute the following command to start the training job
1# If you are training from scratch
2!python model_main_tf2.py --model_dir=models/my_mobilenet --pipeline_config_path=pre-trained-model/ssd_mobilenet_v2_fpnlite_320x320_coco17_tpu-8/pipeline.config# Or if you are continuing from a previous training
3!python model_main_tf2.py --model_dir=models/my_mobilenet --pipeline_config_path=exported_models/pipeline.config
If everything goes well, the training output cell should look like this
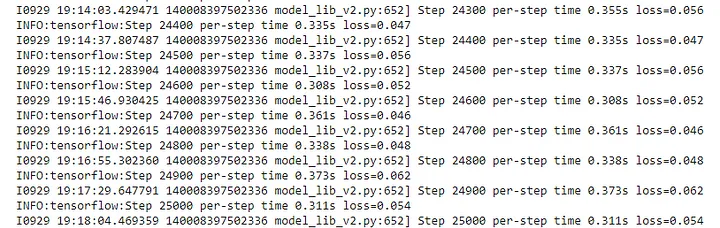
The output will normally update slowly. The training outputs logs only every 100 steps by default, therefore if you wait for a while, you should see a log for the loss at step 100. The speed depends on whether a GPU is being used to train and the available VRAM and many other factors, so be patient.
Refresh the TensorBoard while the training is running and you will be able to monitor the progress

Once the loss reaches a fairly constant value or becomes lower than 0.05(in my case), then you can stop the training cell.
Evaluating the model
Now you can run the evaluation script to find out the mAP (Mean Average Precision) and the Loss.
Run the following in a cell:
1!python model_main_tf2.py --model_dir=exported-models/checkpoint --pipeline_config_path=exported-models/pipeline.config --checkpoint_dir=models/my_mobilenet/checkpoint # The folder where the model has saved the checkpoints during training
You should get an output that looks like this
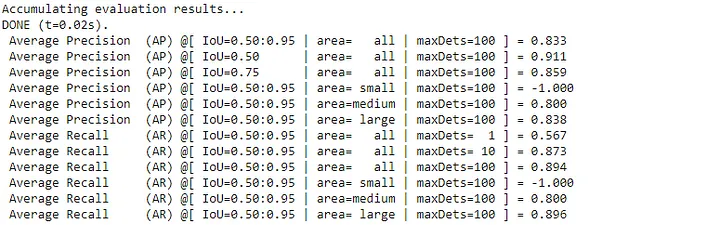
Now the evaluation script has a default timeout of 3600 seconds to wait for a new checkpoint to be generated as the script was initially intended to be running in parallel to the training job, but we are running it after the training process on Colab
You may go ahead and stop the evaluation cell from running.
Exporting the model
Now that we have our model ready, we need to save it in a format we can use it later.
We now have a bunch of checkpoints in the models/my_mobilenet folder. To remove all the older checkpoints and keep the latest checkpoint, I have attached a neat little python script that will do the task automatically.
 1output_directory = 'exported-models/'
 2
 3# goes through the model is the training/ dir and gets the last one.
 4# you could choose a specfic one instead of the last
 5lst = os.listdir("models/my_mobilenet/")
 6# print(lst)
 7lst = [l for l in lst if 'ckpt-' in l and '.index' not in l]
 8steps=np.array([int(re.findall('\d+', l)[0]) for l in lst])
 9last_model = lst[steps.argmax()]
10last_model_path = os.path.join('models/my_mobilenet', last_model)
11# print(last_model_path)
Now to export the model, we run the export script provided by TF2, as follows:
1!python /content/workspace/models/research/object_detection/exporter_main_v2.py --input_type=image_tensor \
2--pipeline_config_path=pre-trained-model/ssd_mobilenet_v2_fpnlite_320x320_coco17_tpu-8/pipeline.config
3--output_directory=exported_models \
4--trained_checkpoint_dir=models/my_mobilenet
The export script will save the model in the exported_models folder with the following structure
workspace/
├─ exported_models/
   ├─ checkpoint/
   ├─ saved_model/
   ├─ pipeline.config
You can now upload this folder to Google Drive or download it to save it for future use.
Inference on the model
The final step, the step that fills you with a sense of accomplishment, in this step we will test our model on a random input image and see the model predict the type of object and give its bounding box.
The entire process is a little tedious but I will attach a script that will let you perform inference directly on Google Colab
 1import numpy as np
 2from PIL import Image
 3from google.colab.patches import cv2_imshow
 4
 5def load_image_into_numpy_array(path):
 6    """Load an image from file into a numpy array.
 7    Puts image into numpy array to feed into tensorflow graph.
 8    Note that by convention we put it into a numpy array with shape
 9    (height, width, channels), where channels=3 for RGB.
10    Args:
11      path: the file path to the image
12    Returns:
13      uint8 numpy array with shape (img_height, img_width, 3)
14    """
15    return np.array(Image.open(path))
16
17image_path = "PATH TO YOUR INFERENCE IMAGE"
18print('Running inference for {}... '.format(image_path), end='')
19
20image_np = load_image_into_numpy_array(image_path)
21
22# Things to try:
23# Flip horizontally
24# image_np = np.fliplr(image_np).copy()
25
26# Convert image to grayscale, (You could uncomment this to try and see how the model reacts to a grayscale image)
27# image_np = np.tile(
28#     np.mean(image_np, 2, keepdims=True), (1, 1, 3)).astype(np.uint8)
29
30# The input needs to be a tensor, convert it using `tf.convert_to_tensor`.
31input_tensor = tf.convert_to_tensor(image_np)
32# The model expects a batch of images, so add an axis with `tf.newaxis`.
33input_tensor = input_tensor[tf.newaxis, ...]
34
35detections = detect_fn(input_tensor)
36
37# All outputs are batches tensors.
38# Convert to numpy arrays, and take index [0] to remove the batch dimension.
39# We're only interested in the first num_detections.
40num_detections = int(detections.pop('num_detections'))
41detections = {key: value[0, :num_detections].numpy()
42              for key, value in detections.items()}
43detections['num_detections'] = num_detections
44
45# detection_classes should be ints.
46detections['detection_classes'] = detections['detection_classes'].astype(np.int64)
47
48image_np_with_detections = image_np.copy()
49
50viz_utils.visualize_boxes_and_labels_on_image_array(
51      image_np_with_detections,
52      detections['detection_boxes'],
53      detections['detection_classes'],
54      detections['detection_scores'],
55      category_index,
56      use_normalized_coordinates=True,
57      max_boxes_to_draw=200,
58      min_score_thresh=.4, # Adjust this value to set the minimum probability boxes to be classified as True
59      agnostic_mode=False)
60
61cv2_imshow(image_np_with_detections)
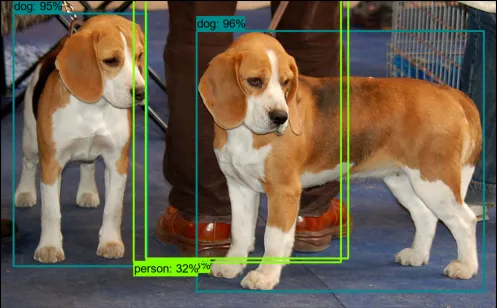
The output of the inference should be like this
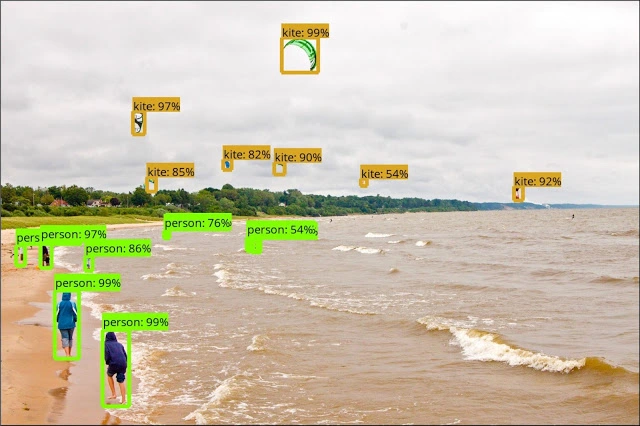
You can use the above script to fashion it into using a video as an input and perform inference on that.
Conclusion
Congratulations! You have built an object detection model with TensorFlow 2.
That’s it for the tutorial! Hope you face no issues while following along, if there are any questions please comment and I will respond to your queries.
Refer to the Tensorflow Github.
If you like this article or any of my other articles, please consider supporting me on my Patreon!
Thank you for reading!